pam-python: local root escalation (CVE-2019-16729)
Last week the openSUSE Security Team spent some time to check and review the PAM module from the pam-python project. Main reason for that – to make sure that the source code of the project is secure enough and bug free of course. Badly implemented PAM modules may cause user authentication to always succeed or otherwise badly influence security.
The audit process was done by Malte Kraus. He found the local root exploit in version 1.0.6, which was the last stable one since August 2016. Reaction from the upstream comes immediately: Russell Stuart, who is author of pam-python, released the new official version – 1.0.7.
PAM module from version 1.0.7 is whitelisted by openSUSE Security Team. I rebuild the new packages of pam-python and made it available for all openSUSE users.
How to detect SSH or SCP is using?
That was interesting to spend some time and to try to detect what kind of service is use SSH. As you know, OpenSSH provides ssh(1) and scp(1) programs. Both use the same protocol and the same port number. In fact, both programs has been developed exactly with purpose to be secure enough to protect its users to network packet analysis. But there is nothing more interesting that to try to figure out how exactly all these things works together and try to find a way to detect what service is used on the server.
My first idea was to get this information from OpenSSH server itself, because I was pretty sure that packet analysis will not help me. There is an option in the config file calling LogLevel. The default value (tested on openSUSE) is set to INFO. Let’s change it to DEBUG3 and restart OpenSSH server. After that try to copy something to the server and check the syslog:

As you can see, server provide this information very easily. The problem is – I need to be root and I need to reconfigure and restart OpenSSH server… that is not intelligent and that’s why it’s a bit boring. How we can get the same information without root-right on the server? There is the second way to get it. You will not need root-right, you will not need to be on the server at all.
Welcome to the network packets analysis 🙂
Yeah, I was wrong to thinking that sniffer will not help. But please don’t misunderstand me, SSH connections is pretty secure! There is no way no recognize or find some differences in secure shell or secure copy connections. What kind of authentication is used – password or publickey authentication – is also terra incognita. Packets generated by OpenSSH looks same in all cases. At least by authentication phase… 🙂
As you know, SSH is a cryptographic network protocol and it operates on the Application layer. It’s great and amazing, but it does nothing with bottom layers. And this is exactly where our story begins.
As I said, authentication phase is secure, but after the new connection is established (open_session phase is done) the picture changes drastically and I would even say – dramatically. The culprit here becomes a DSCP/ToS or Differentiated services.

Differentiated services, as the name says, differentiates the ToS-bit depend on used service. In case of SSH, for secure shell ToS-bit will be sets to 0x10 and for secure copy it has value 0x08. Yes, it seems that the IP header (where ToS-bit is) “includes information” about upper layers content… Unbelievable. I know, it sounds like a craziness. I’m still think that I get something wrong, but let’s repeat it together.
The tcpdump’s expression for filtering content of IP header looks like this:
sudo tcpdump -n -i any -v 'ip[1] & 0xfc == 0x10' and port 22
This filter will parse IP packets, where ToS sets to 0x10 (for normal secure shell).
Change it to 0x08 to get a filter for SCP-connections.
You don’t need to be root on the machine where OpenSSH server is running, you don’t need to login on this machine at all. As we all know, to sniff the traffic (encrypted or not) can be easily happen by using the MITM-attack.
You can add port 22 at the end of tcpdum command to get “SSH packets”, but don’t trust it too much, because… to reconfigure OpenSSH server to use other port, say 2222, is not a big deal. Unfortunately, it seems like tcpdump doesn’t support filters for application protocols like SSH and we can just sets the port number (in the hope of the using of standard port). But there could be used a small trick – at the beginning of the connection establishing (exactly after TCP three-way-handshake), OpenSSH client and server exchange its application version and version of used SSH protocol. It’s not encrypted. This wireshark screenshot shows that system has no idea to what service/protocol belongs this data and it says just “Data”, but you can see in TCP header that port of server is 2222:
 Should I say, that theoretically every server (implemented by bad guys) can send the similar “fake SSH-data” to deceive or just to confuse you? 🙂 So, be careful with filter for something like *OpenSSH_; check it carefully.
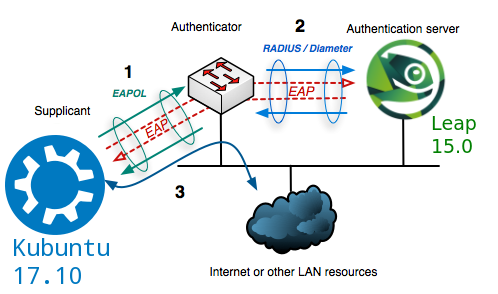
Leap 15.0 Beta testing: configuring 802.1x (auth with RADIUS)
 В этом посте я попытаюсь рассказать как настроить IEEE 802.1x в openSUSE. Сейчас Leap 15.0 в активной стадии бета-тестирования, поэтому возьмем её и для клиента и для сервера, чтобы убедиться, что все работает как надо, и никаких неприятных сюрпризов в финально-официальном релизе нам ждать не придется.
Если в двух словах, 802.1x это стандарт сетевой аутентификации. Работает на втором OSI уровне и определяет механизм контроля доступа к сети на основе принадлежности к порту и проверки x509-сертификатов. Доступ к сети получают только клиенты прошедшие аутентификацию. В качестве “системы, проверяющей подлинность” или просто аутентификатора я буду использовать CISCO SG300-28 28-Port Gigabit Managed Switch. Для проверки он будет обмениваться сертификатами с authentication server, который мы попытаемся развернуть на отдельной машине и который будет колдовать для нас x509 TLS-сертификаты.
Authentication server
Когда я только задумывал этот пост, я представлял это себе как “пустяковое дело на 20 минут”. Сразу же после установки я понял, что “приключение начинается”. Инсталлер разучился отключать firewall и включать OpenSSH. Фича? Аха щас… BUG! Первый баг. Попался 🙂 Пытался сначала достучаться до людей в IRC, все бестолку. Три дня думал, что я что-то пропустил и искал информацию. Так ничего и не найдя, я заглянул в ML, где меня ждал успех.
Очень не приятно после установки заходить в систему и отключать firewalld и включать sshd… но на сейчашний момент это именно то, что мы имеем:
# systemctl stop firewalld
# systemctl disable firewalld
# systemctl start sshd
# systemctl enable sshd
Напомню, что мы тут просто тестируем 802.1x. На практике отключать firewall конечно же не обязательно, достаточно открыть UDP/1812 и UDP/1813 порты.
Приступаем к установке authentication server. Мы будем использовать freeradius. Последняя стабильная версия – 3.0.16 – вышла два месяца назад. В openSUSE пакет называется freeradius-server. Устанавливаем его:
> sudo zypper in freeradius-server
> rpm -qa freeradius-server
freeradius-server-3.0.16-lp150.1.3.x86_64
После установки переходим в /etc/raddb/certs. Тут все будем делать от root.
# ll /etc/raddb/certs
total 48
-rw-r----- 1 root radiusd 6155 Feb 20 06:18 Makefile
-rw-r----- 1 root radiusd 8714 Feb 20 06:18 README
-rwxr-x--- 1 root radiusd 2706 Feb 20 06:18 bootstrap
-rw-r----- 1 root radiusd 1432 Feb 20 06:18 ca.cnf
-rw-r----- 1 root radiusd 1103 Feb 20 06:18 client.cnf
-rw-r----- 1 root radiusd 1131 Feb 20 06:18 inner-server.cnf
-rw-r--r-- 1 root radiusd  166 Feb 20 06:18 passwords.mk
-rw-r----- 1 root radiusd 1125 Feb 20 06:18 server.cnf
-rw-r----- 1 root radiusd  708 Feb 20 06:18 xpextensions
Документация о том, как сгенерировать сертификаты (самый минимум) находится в файле README. 3 шага: генерация root-сертификата (ca.pem), генерация сертификата сервера (server.pem) и клиента (client.pem). Необходимые параметры нужно указать в конфиг файлах: ca.cnf, server.cnf и client.cnf соответственно.
Несмотря на то, что все кажется простым и логичным, генерация TLS/SSL сертификатов может быть оказаться достаточно запарным процессом. Особенно если вы нечасто этим занимаетесь. Дело в том, что сообщения об ошибках не всегда понятны. Давайте рассмотрим пару примеров.
Во-первых, нигде не сказано, что пароль в /etc/raddb/certs/server.cnf и /etc/raddb/mods-enabled/eap должен быть один и тот же. Вот в этом месте файла /etc/raddb/mods-enabled/eap надо быть осторожней:
        tls-config tls-common {
                private_key_password = myTEST1eap
                private_key_file = ${certdir}/server.pem
Вот так выглядит часть /etc/raddb/certs/server.cnf файла, где нужно быть чуточку внимательней:
[ req ]
prompt                  = no
distinguished_name      = certificate_authority
default_bits            = 2048
input_password          = myTEST1eap
output_password         = myTEST1eap
x509_extensions         = v3_ca
Если пароли окажутся разными, то при запуске cервера мы получим в логах вот это:
Wed Mar  7 17:08:15 2018 : Info: Debugger not attached
Wed Mar  7 17:08:15 2018 : Error: tls: Failed reading private key file "/etc/raddb/certs/server.pem"
Wed Mar  7 17:08:15 2018 : Error: tls: error:06065064:digital envelope routines:EVP_DecryptFinal_ex:bad decrypt
Wed Mar  7 17:08:15 2018 : Error: tls: error:23077074:PKCS12 routines:PKCS12_pbe_crypt:pkcs12 cipherfinal error
Wed Mar  7 17:08:15 2018 : Error: tls: error:2306A075:PKCS12 routines:PKCS12_item_decrypt_d2i:pkcs12 pbe crypt
error
Wed Mar  7 17:08:15 2018 : Error: tls: error:0907B00D:PEM routines:PEM_read_bio_PrivateKey:ASN1 lib
Wed Mar  7 17:08:15 2018 : Error: tls: error:140B0009:SSL routines:SSL_CTX_use_PrivateKey_file:PEM lib
Wed Mar  7 17:08:15 2018 : Error: rlm_eap_tls: Failed initializing SSL context
Wed Mar  7 17:08:15 2018 : Error: rlm_eap (EAP): Failed to initialise rlm_eap_tls
Wed Mar  7 17:08:15 2018 : Error: /etc/raddb/mods-enabled/eap[14]: Instantiation failed for module "eap"
Согласитесь, с ходу не ясно в чем тут может быть проблема.
Остальные пароли могут быть (должны быть) разными.
Во-вторых, можно забыть про команду:
# openssl dhparam -out dh 2048
В bootstrap скрипте она есть, но если вы решите сгенерировать сертификаты дважды и отчистите все командой
# make destroycerts
то make удалит и файл /etc/raddb/certs/dh, а при make ca.pem или make server.pem файл dh снова создан не будет. При запуске сервера это приведет к следующему сообщению в логах:
Wed Mar  7 16:18:44 2018 : Info: Debugger not attached
Wed Mar  7 16:18:44 2018 : Error: Unable to check file "/etc/raddb/certs/dh": No such file or directory
Wed Mar  7 16:18:44 2018 : Error: rlm_eap_tls: Failed initializing SSL context
Wed Mar  7 16:18:44 2018 : Error: rlm_eap (EAP): Failed to initialise rlm_eap_tls
Wed Mar  7 16:18:44 2018 : Error: /etc/raddb/mods-enabled/eap[14]: Instantiation failed for module "eap"
Обратите внимание, что в README файле написано, что удалять старые сертификаты нужно вот так:
# rm -f *.pem *.der *.csr *.crt *.key *.p12 serial* index.txt*
т.е. без dh файла. Это, пожалуй, единственная проблема, суть которой ясна из сообщения об ошибке.
И вот еще одина проблема, с которой, я надеюсь, никому не придется столкнуться:
failed to update database
TXT_DB error number 2
Она возникает по причине того, что CN (Common Name) для генерируемого сертификата такое же как и для CA-сертификата.
Последний шаг настройки RADIUS – прописываем имя, ip и secret клиента (остальное можно оставить как есть) в /etc/raddb/clients.conf. Клиент в данном случае – наш cisco-коммутатор. Шаг простой, но очень важный. Без него RADIUS не будет отвечать коммутатору. Secret тут должен быть как можно сложнее.
После того как все сертификаты созданы, для уверености их можно сверить:
# openssl verify -CAfile ca.pem client.crt client.pem
client.crt: OK
client.pem: OK
Если все в порядке, запускаем сервер, проверяем созданные им сокеты:
# systemctl start radiusd

# lsof -i :1812
COMMAND  PID USER   FD   TYPE DEVICE SIZE/OFF NODE NAME
radiusd 4811 root    7u  IPv4 179990      0t0  UDP *:radius
radiusd 4811 root    9u  IPv6 179994      0t0  UDP *:radius

# lsof -i :1813
COMMAND  PID USER   FD   TYPE DEVICE SIZE/OFF NODE NAME
radiusd 4811 root    8u  IPv4 179993      0t0  UDP *:radius-acct
radiusd 4811 root   10u  IPv6 179995      0t0  UDP *:radius-acct

# tcpdump -vv -n -i eth0 -S port 1812 -l -A -X
Последняя команда может помочь при отладке. Вы видете, что именно ушло в сеть. Даже если вы подробно не знакомы с EAP, можно заметить отличие удачных попыток авторизации и не очень удачных 🙂 Если по той или иной причине возникли проблемы, log radius-сервера находится в /var/log/radius/radius.log.
Если все же возникнет какая-то новая проблема, которая тут не описана, и вы начнете искать информацию в инете и найдете примеры программы radtest(1) и попытаетесь ее запусить… в openSUSE она лежит в отдельном пакете:
> rpm -qf $(which radtest)
freeradius-server-utils-3.0.16-lp150.1.3.x86_64
Я не стал описывать ВСЕ, что мне пришлось пережить за эти пару дней… и так этот пост разбух и стал походить на статью. Возможно я напишу еще что-то о самой openssl в отдельной статье. Тема PKI очень интересная и нужная. Ее понимание требуют многие работадатели.
Но вернемся к нашему тестированию. Переходим к настройке нашего коммутатора. Пока новых жуков не обнаружено 🙂
Authenticator
Настройка аутентификатора (или “системы, проверяющей подлинность”) сводится к простому добавлению в список RADIUS-серверов только что настроенной машины. Security => RADIUS => Add:
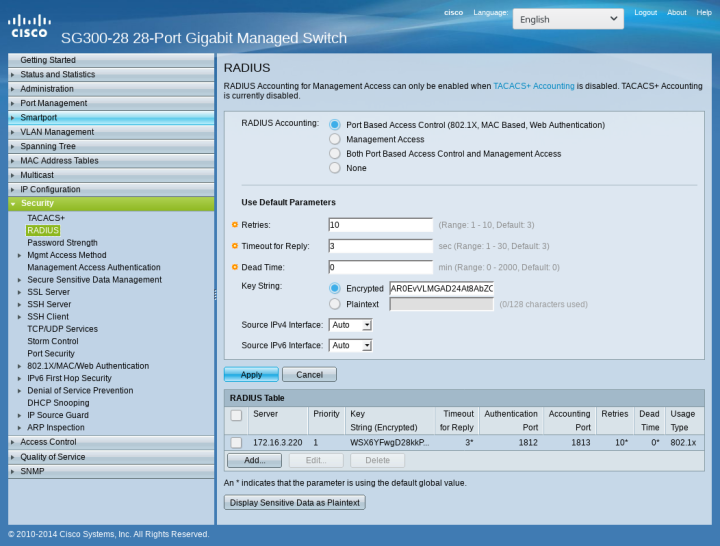
В появившемся окне просто добавляем IP-адрес и secret, который мы указывали /etc/raddb/clients.conf на RADIUS-сервере. Secret – это фактически единственный механизм аутентификации между cisco-коммутатором и сервером проверки подлинности (RADIUS). Эта часть сети в 802.1x-схеме подразумевает достаточно доверительные отношения между хостами, т.е. остается практически не защищенной. Поэтому повторюсь – secret должен быть как можно сложнее.

Client
Переходим к последнему шагу – настройке клиента.
Да, друзья мои, в качестве клиента openSUSE сейчас использовать увы, не получится. Для тестирования 802.1x мне пришлось взять какой-то другой GNU-дистрибутив. Но обо всем по порядку.
Сначала я поставил Leap 15.0 Beta с Plasma 5.12 LTS. networkmanagement отказался создавать соединение, и я сначала подумал, что проблема в созданных мной сертификатах. Я потратил несколько дней на проверку и перегенерацию сертификатов. Я устанавливал Leap с GNOME… с Xfce… и вообще без X. Паралельно я проверял все в Tumbleweed, и это меня и сбило с толку. Там соединение тоже не работало и я подумал, что проблема на 8 OSI уровне 🙂
Через несколько дней я попробовал другие GNU-дистрибутивы и оказалось, что, используя те же самые сертификаты и конфиги, там соеднинение удается создать одной командой…
BUUUUG! Да, черт побери, и сидит он так глубоко, что ни одним NM-апплетом его не достать. Он воспроизводится и через nmcli(1):
# cat /etc/NetworkManager/system-connections/LEAP_8021x
[connection]
id=LEAP_8021x
uuid=de2f2a7c-33cc-4d92-ae3b-785575dffddc
type=ethernet
permissions=user:alex:;

[ethernet]
auto-negotiate=true
mac-address-blacklist=

[802-1x]
ca-cert=/home/alex/ca.pem
client-cert=/home/alex/client.crt
eap=tls;
identity=GNOME
private-key=/home/alex/client.pem
private-key-password=GNOME

[ipv4]
dns-search=
method=auto

[ipv6]
addr-gen-mode=stable-privacy
dns-search=
method=auto

# nmcli con reload

# nmcli con up LEAP_8021x
Secrets are required to access the wired network 'LEAP_8021x'
Warning: password for '802-1x.identity' not given in 'passwd-file' and nmcli
cannot ask without '--ask' option.
Error: Connection activation failed: Secrets were required, but not provided
Secret я использую и в конфиге и прописывал его и в апплетах GNOME и KDE. Не принимает ни в какую.
Пробовал испльзовать ‘–ask’, результат тот же: спашивает, вводишь пароль… снова спрашивает, снова вводишь… снова спрашивает…
# nmcli con up LEAP_8021x --ask
Secrets are required to access the wired network 'LEAP_8021x'
Identity (802-1x.identity): GNOME
Secrets are required to access the wired network 'LEAP_8021x'
Private key password (802-1x.private-key-password): *****
Secrets are required to access the wired network 'LEAP_8021x'
Identity (802-1x.identity): GNOME
Secrets are required to access the wired network 'LEAP_8021x'
Private key password (802-1x.private-key-password): *****
Я использовал и wpa_supplicant(1). Результат такой же. Он просто повисает.
Чтобы довести дело до конца я взял Kubuntu 17.10. Выбор был не случайным, т.е. это не был “первый дистрибутив, который попался под руку”. Пока я искал инфу по поводу проблем с 802.1x, я нашел этот BUG. Я не уверен, что это именно то, но повеселил меня не тот факт, что проблема в upstream’е, а то, КАК это решили в Ubuntu 🙂 Ребятами из RedHat (хотя там ссылка на GNOME, а оттуда на Debian…) было предложено и другое решение. Следить за изменениями я уже не стал. Хотя разобраться до конца все же стоило бы.
В Kubuntu 17.10 просто кидаешь конфиг в /etc/NetworkManager/system-connections/802.1x и перезапускаешь сеть (без ‘–ask’), как я показал выше. Понадобятся 3 сертификата: клиентские сертификаты client.pem и client.crt (к ним надо знать secret) и root-сертификат CA.pem. При генерировании новых клиентских сертификатов нужно лишь обновить client.cnf (имя и secret) и сделать
# make client.pem
Помните, что в случае повторной генерации root-сертификата придется перенастраивать уже настроенные клиенты.
Итак, ситуация Leap 15.0 пока очень и очень не классная. BUG’ов в beta хватает. О них знают, и можете быть уверенными, друзья мои, их исправят.
Оставайтесь на светлой стороне. И да прибудет с вами удовольствие от работы с openSUSE 🙂

pam-accesscontrol: PAM-based access control system written in python
In traditional UNIX/Linux authentication there is not much granularity available in limiting a user’s ability to login. For example, how would you limit the number of users from a specific group? What if you want to allow some users to log in from a specific host, but disallow all others from a same host? Firewall can not help at this point. What if you want to allow SSH for someone, but not X- or login sessions on tty? And… what if you want to be able to decide about allowing SSH-session for someone at the same moment when connection will be established?
PAM, or pluggable authentication modules, allows for you just this sort of functionality (and more) without the need to patch all your services. PAM is flexible enough to provide solution for all of the above listed issues. All what you need at this point is just implement a new PAM-plugin for your needs.
Some times ago I came across pam_python — a PAM module that lets you write PAM modules in python. During paying with pam-python I implemented my own plugin as a hobby. At the beginning that was just notification window about every new incoming SSH connection. After that I added possibility to allow or denied every new established SSH connection by asking the owner of the X session (that was implemented just for desktop users in mind, of course). Next – define the list of users who may to login any time, who should wait for confirmation and who should never get the shell on my machine. I came on idea to put these lists to the config file. Project grew quickly. Now I would like to introduce it, show the sources and invite everyone (who love coding) to take a part of the development 😉
Introducing
I called it pam-accesscontrol. Before we start I would like to remind you, that it was implemented as a hobby project just for fun and it’s still unstable, i.e. can broke something on your system. “Someting” is, for example, possibility to login via tty/login(1), SSH or display manager . So, you can just look at the source code or, if you really know what you’re doing, install the package.
To be able to understand how PAM and pam-accesscontrol communicate with other, take a look at doc-page where you can find the list of pam-python methods which are nothing other then a interface for Linux PAM APIs. Every PAM event like open_session, close_session, authenticate, etc. will call appropriate pam-python method. This method will call appropriate pam-accesscontrol function.
For example, OpenSSH: by using password authentication procedure PAM calls pam_authenticate function, which call pam-python’s pam_sm_authenticate function. You just need to implement pam_sm_authenticate-method in your plugin to intercept further steps in the authentication process. Pam-python is just a “bridge” between PAM and pam-accesscontrol:

As you can see, we also should tell PAM (add configuration to files in /etc/pam.d/ directory) to call plugin in some necessary cases. Necessary cases are services like, for example, sshd or login (depend on our wishes) and events like auth, session, etc.
List of all available PAM modules can be found in /lib/$(arch)-linux-gnu/security/ directory. After installiing pam-python package pam-python.so file should be there and after installing pam-accesscontrol package — accesscontrol.py script.
/etc/pam-accesscontrol.d/pam-accesscontrol.conf
PAM-accesscontrol’s behavior depend on its config file. You add rules for /etc/pam.d/* services like sddm or login. It’s similar to iptables rules: by an authenticate new user or creating new session, pam-accesscontrol will read config file, parse it and try to make a decision. Actually, pam-accessconfig is nothing else then just a parser. It’s possible to close access for everybody and specify in what case and for whem it will be open, or vice versa — just define who should have no access. At the end, decision has made by pam-accesscontrol will be returned to PAM.
Right after package installing it has just one rule in its config file: DEFAULT:OPEN, i.e. access open for everyone. If this DEFAULT variable will be not set in config file, pam-accesscontrol initialize it with CLOSE value.
Let me show some configuration examples.
> cat /etc/pam-accesscontrol/pam-accesscontrol.conf

DEFAULT:CLOSE
sshd OPEN GROUP lp,users
sddm OPEN USER bob,alice
login OPEN USER bob,alice
First line of this configuration closes access for all users. After that we open SSH (password authentication) for all users from lp and users groups (it supports LDAP groups, POSIX groups and primary user groups); open access via sddm for users bob and alice; open access via login for users bob and alice. Pretty easy. Every rule should have exactly 4 fields. If rule is broken, it will be just ignored.
It’s possible to set limit for number of users from specific group.
sshd NUMBER GROUP users:2,lp:3
For example, this line sets limit to 2 for group users and to 3 for group lp. In other words, new SSH connection will be possible for users from group lp, if only 2 or less users will be logged on this system at the same time.
It’s also possible to configure it so that it will ask you for every new incoming connection. With this line in config file everyone from group lp will wait for your confirmation:
sshd-key ask group operation
It means, access will be granted via SSH by using public-key authentication only for someone from group operation… only if X-session owner allow it.
It calls QMessageBox from PyQt5 that returns 0 or 1 to pam-accesscontrol depend on your choice. This value will be interpreted as allow or not allow. By the way, if there is no active Xorg session, pam-accesscontrol will not be able to ask you… so in this case this will be interpreted as an OPEN rule. Also keep in mind that pam-accesscontrol ask owner of the Xorg session only for the first SSH incoming connection. Remote user would like, for example, to copy 100 files on its host; in that case also just one confirmation at the begging will be needed.

X-session owner also will be informed when remote user (whose SSH session was confirmed through QMessageBox) ends its SSH session.
Debugging
Pam-accesscontrol uses syslog. It creates logs after every successful authentication. As usual, on systemd-based systems you can use journalctl(1). Also some logs can be found in /var/log/auth.log (authentication phase) and /var/log/syslog files. By default, there is not so much information. For debugging and during development it’s a good idea to enable debug/verbose mode. Add debug:true to the config file and it will put much more info about why it made this or that decision.
It also creates its own logfile /var/log/pam-accesscontrol-YEAR-MON.log where is stored short statistic about when, who, via which interface tried to login and also — was it successful or not.
Use ldd(1) to check PAM compatibility for supported interfaces:
# ldd $(which sshd) | grep pam
        libpam.so.0 => /lib64/libpam.so.0 (0x00007f82cdfff000)
# ldd $(which login) | grep pam
        libpam.so.0 => /lib64/libpam.so.0 (0x00007fee7f3c9000)
        libpam_misc.so.0 => /lib64/libpam_misc.so.0 (0x00007fee7f1c5000)
pam-python is avaliable for openSUSE
Last week I came across pam_python, a PAM module that lets you write PAM modules in Python. It seems interesting to play in this direction, but I had to install it manually. It seems that there was no official packages for openSUSE until now…
Yesterday I built version 1.0.6 for Tumbleweed. Please test it. It’s in our security repo. Feel free to send submit requests.
After installing it we will get /lib64/security/pam_python.so PAM modul. It’s just an interface between PAM and your own plugin (that you have to implement). To test it, you will need to add PATH of your plugin to the /etc/pam.d/login file (in case of getty-access test, for example), like described here.
This code can be used as an example. It will close access for all getty.
> cat /lib64/security/access.py

def pam_sm_authenticate(pamh, flags, argv):
  if str(pamh.service) == "login":
    return pamh.PAM_AUTH_ERR
You will also need to add this line to the /etc/pam.d/login file:
auth required pam_python.so access.py
This is just an example with login service or getty. Pam-python supports also, for example, ssh- and kdm-services. It supports many other interesting things. For more info look at documentation page.
A bit about POP3
На сколько большая разница между такими понятиями как “делать” и “делать хорошо”? Я думаю, что каждый определяет это для себя сам. Зависит она от многих факторов, таких как например ответственность и квалификация сотрудников, рабочая атмосфера или просто умение начальника найти правильный подход к каждому из своих подчиненных (с целью повышения эфективности команды в целом).
Я практически забросил свой блог. Но об этом случае мне все же очень захотелось рассказать. Этот случай настолько банален, что я просто не могу пройти мимо. Я встречаю его постоянно. Наверняка в вашей сети есть что-то подобное. Я говорю не о технической части, а скорее о причинах, которые приводят к подобным курьезам. Для тех кто не знает: я работаю сетевым инженером; моя работа заключается в анализе клиентских сетей, а именно – поиске любых неполадок, анализе сетевого трафика, проверок систем безопасности и т.д.
Итак, как вы наверняка знаете, pop3 и imap передают информацию в открытом виде. В том числе и логин с паролем. По этой причине их использование без дополнительных технологий шифрования крайне нежелательно. Сервера, которые смотрят в интернет, как правило защищены как надо, но почему-то для внутренней инфраструктуры всегда применяются другие правила. В Германии есть такое понятие как “historische Gründe”. Очень распространенное. Дословный перевод – “историческая причина”, т.е. это эдакая причина, почему что-то работет не так как следовало бы, но при этом никто не делает никаких изменений, и все остается как есть. Что-то когда-то было настроенно не самым лучшим образом. На это конечно же тогда были причины. Но все остается как есть, и что-то менять, несмотря на то, что меняются сотрудники, меняется инфраструктура, никто не берется. В последствии это “не самым лучшим образом” перерастает в проблему.


2 comments